
Monday, April 25, 2016
A little organization goes a long way....
Monday, April 18, 2016
The Versatility of the Cupcake!

 |
| Black Forest Cupcake - a single sweet treat! |


They can also be "accessorized" with pieces of cookie to create an entirely new look...like a high-heeled shoe!

Even better...you can stack them to create an object... like a race car!

You can arrange them in a shape like a circle to make a wreath....or in a triangle to form a Christmas tree....


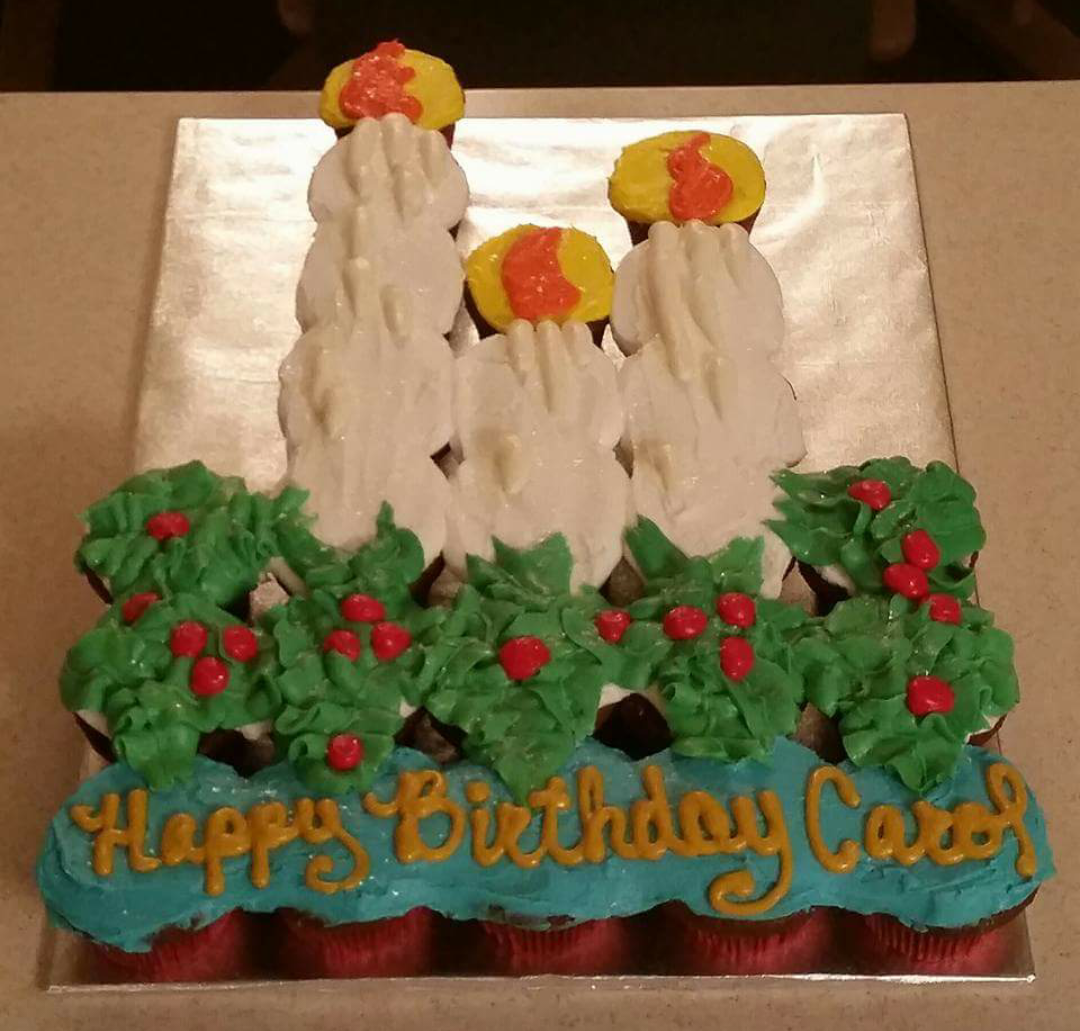
You can lay out two dozen in just the right way and turn them into a beautiful trio of Christmas candles....
If you google "pull apart" cupcakes or "pullaway" cupcakes or search them on Pinterest, you will find lots of neat ideas for how to put cupcakes together in various formations. You can even ice them afterwards so they look like an iced cake. You can't see where they begin and end. The cool thing about pull apart cupcake cakes is that you don't need a knife to serve them. You simply take the cake to the event and everybody can just grab their cupcake and pull it away from the rest. Less fuss! Great for elementary school parties! Here are some samples of pull apart cupcake cakes I have done....
 |
| This was for my daughter's birthday....an aerial shot of the community swimming pool we frequented. She had her birthday party at this pool. |
 |
| These cupcakes formed a type of badge awarded to Brownies (Girl Scouts) called Try-Its. This cake was made to thank the troop leader who was retiring. |
 |
| This was a map of the world that my nephew Joshua neede to make for a school project. He was allowed to have help creating the map but he had to label 41 parts on his own after it was done. The next photo shows the labels he added. He was popular at school that day! |
 |
| Joshua labeled 41 parts of this map and presented this map to his class, after which he and his fellow students and teachers got to eat the project! |
Another great thing about making a pull apart cupcake cake is that you can use various flavors in the same cake. The photo below shows a cake where the customer needed cake for 7 people. He wanted two servings of red velvet, two of chocolate, and two of vanilla, and one of lemon. I put the single lemon cupcake in the center and surrounded it by two each of the other three flavors. I iced it on top so it looked like one cake and put a border on it to pull it together. I instructed him ahead of time that the lemon one was in the center. They were able to tell the other flavors apart by looking at the paper liners on the sides because the flavors showed through the paper.

Of course, cupcakes are great in LARGE NUMBERS as well. The photos below show a beautiful display of cupcakes for a wedding. Pictured are 146 cupcakes. The wedding guests had four cupcake varieties to choose from.... chocolate with chocolate icing, chocolate with vanilla icing, vanilla with vanilla icing, or vanilla with chocolate icing. I made a very small layer cake for the bride and groom to cut, but the wedding attendees got to choose cupcakes!


As you can see, the possibilities are endless when it comes to cupcakes!
And don't forget the sprinkles.... because sprinkles are for winners!
It's totally awesome!!!!
 |
I was introduced to LA's Totally Awesome by a friend a few years ago. I buy it at my local dollar store, the Dollar Tree. It comes in a squirt bottle but also comes in refill bottles as well. Just a buck! I keep a bottle hidden away at the bakery and also keep one under the sink in my kitchen at home. When it's time to dye icing, I don't bother wearing gloves. I hate wearing gloves. They make my hands hot! Instead, I go ahead and let my hands get all dyed up, knowing that I can erase away the color in seconds. SECONDS!
Here's my blue hands before....

And with just a few squirts of Totally Awesome....rubbing my hands together vigorously...followed by some hot, soapy water....

Ta da!!! Clean hands! No more dye! I will say, this stuff can feel like washing your hands in gasoline. You'll feel dry afterwards, and I always apply some moisturizer to my hands generously aferwards. But it's nice to know I can get the dye off so easily! I've even gotten Sharpie marker off of my hands with this wonderful product.
It's LA's Totally Awesome.... it's a buck... and it truly is awesome stuff!
Tuesday, April 12, 2016
Cake Tutorial: Petal Technique

One of my favorite things about the "petal technique" with buttercream icing is that it covers the side of a cake so well that you don't have to worry about how smooth you get the sides. A quick coating of icing will do because the petals will cover up any crumbs or thin spots! To start out, I iced the cake with a crumb coat followed by a second thicker layer of icing at which point I smoothed out the top with a spatula and smoothed the sides with a scraping blade.
 |
| Crumb Coat |
 |
| Thicker base coat of icing |
 |
| Use a scraping blade to smooth the sides |
 |
| A fairly smooth cake to start with..... |

Place the spatula at the outer edge of the top of the cake and while turning the cake stand in a clockwise position, allow the blade of the spatula drag across the top of the cake, moving in a little each time you make a full circle, until you end up with a complete chocolate spiral design ending in the center of the cake.
 |
| Use the spatula to make a spiral design. |

Now to create the petals. You'll need to fit a piping bag with a large piping tip with a round opening.

Working up the side of the cake, pipe four balls of icing in a vertical line. I was able to fit four up the side of the cake!

Using the same offset spatula that made the spiral on the top of the cake, press the spatula into each icing ball and drag it to the right to turn the icing ball into a petal. You will need to stop and scrape the icing off of the spatula onto the edge of a bowl to keep it cleaned off as you go. I'd suggest for every three balls you turn into petals you stop and scrape off the spatula.
 |
| Scrape the balls to the right to form a petal. |
 |
| One row of petals complete. |


Continue dragging the balls of icing to form the petals and work your way around the cake, covering the entire outside of the cake in petals.


When you get back to where you started, the last column of balls will be scraped as close to the edge of the first column as possible. This portion of the cake will definitely be the BACK of your cake when you display it.

A nice finishing touch on this cake is a border on the top in white which really stands out on the chocolate icing. I did a "c" border around the top with a large open star tip.


To give the bottom a more finished look, I used the same large open star tip to create a drop star nestled into the bottom petal all the way around the bottom of the cake.


And the finished product looks like this...

When I do this petal technique, the cake doesn't stay on the shelf long. It sells fairly quickly every time. Some other options with the petal technique would be to do an ombre look where the petals go from a dark color at the bottom to a lighter color at the top.... or to alternate colors (white, chocolate, white, chocolate). Another option would be a rainbow look with each color being completely different and then alternating the order of the colors each time.
Here's a shot of the same design with chocolate borders and drop stars....

And in all white....

And also in alternating yellow and white petals...

A final tip.... each cake is a different height, and you can alternate the size of the icing balls as well. It won't always be the same number of icing balls in a column depending on the size of the cake you are decorating.

The "petal technique" is such a wonderfully easy way to cover the side of a cake without the pressure of having to try to smooth it out and trying to keep the crumbs from showing up! Give it a try. You'll be pleasantly surprised by how easy it is, and it just requires a big round piping tip and an offset spatula! Good luck!!!
Cupcake Tutorial: Cherry Vanilla

The "cherry vanilla cupcake" at the bakery is fairly popular. It's got a complicated look to it, but it's really quite simple to make. Let me show you how.... As always, start by taking out the core of the cupcake with a cutter. If you don't have a cutter, you can use an apple coring tool.


Now it's time for the filling. I use a spoon to scoop out 3 to 4 cherries from a container of cherry pie filling. I try to get a lot of cherries and not just the "gel" around them.

Next I use a Wilton 1M piping tip to pipe a rosette on the top of the cupcake, covering the top completely with vanilla buttercream. I start in the center and swirl outwards.


Now it's time to make it a winning cupcake...by adding sprinkles...because "sprinkles are for winners!!!"


Next, let's make the top of the cupcake pretty by showcasing a cherry or two. Using a spoon, take 1 to 2 cherries and a little of the surrounding "gel" from the pie filling and place them on the top of the cupcake in the center.

Using the same piping bag with the Wilton 1M tip, create a circle of icing around the cherries on top. This will give a little height to the cupcake.

Now for the final garnish....the chocolate drizzle! Melt some chocolate in a piping bag and cut a tiny opening in the tip of the bag. Moving your hands in a right-to-left motion, drizzle the chocolate horizontally across the top of the cupcake so several horizontal lines of chocolate drop onto the cupcake.

Finally, do the same thing with the chocolate drizzle, only this time go vertically. You could also rotate the cupcake and repeat the horizontal motion. The end result is a drizzle in both directions.

Now you have a beautiful cherry vanilla cupcake with chocolate sprinkles and chocolate drizzle garnish. A beautiful cupcake that looks really complicated but is oh so easy.... enjoy!!!
Subscribe to:
Comments (Atom)