Thursday, May 12, 2016

Add a little pudding....

When I bake a cake, I do use a box mix, BUT I do not follow the recipe on the box.  I recently shared my cake recipe on Facebook.  I start with the mix but I add a small box of INSTANT pudding mix, a stick of melted butter, a cup of whole milk, a half a can of sweetened condensed milk, and four eggs.  If I'm making chocolate cake, I add an extra 1/4 cup of milk because it needs more liquid.  I found the strawberry cake needed extra liquid last week too.

When you choose your pudding flavor, you can ALWAYS use vanilla.  Vanilla will work well with ANY flavor.  I like to match the pudding to the cake flavor, though.  As pictured above, for last week's wedding cake, I used French vanilla for the vanilla cake, chocolate for the chocolate cake, and strawberry cream pudding for the strawberry cake.  I didn't even KNOW until last week that they made strawberry cream pudding.

The pudding is just one more thing that makes the cake so moist!  

Wednesday, May 11, 2016

It's all about the bling!

My wedding cakes have been following a trend lately.... bling has taken over!  It seems that sparkle is in!  There are many ways to add sparkle and bling to any cake.  Here are a few ideas...
Wilton Cake Sparkles
1.  Cake Sparkles:  One thing I always add to birthday cakes is sparkle... Wilton Cake Sparkles.  They come in many colors, but the irredescent ones are my favorite.  They add a beautiful sparkly touch to a cake! Completely edible, they are just flakes of sugar. They run close to $5 at Michaels but you can always use your 40% off coupon on them because they are never on sale.  Walmart carries them as well.  Just don't wait until the last minute to purchase them as the irridescent ones tend to sell out every now and then.  They aren't always readily available.
Rhinestone Banding
2.  Rhinestone Banding:  You can purchase this in craft stores.  It's actually just plastic that simulates the look of rhinestones.  It comes in bands of different widths.  I've seen it as skinny as one row of rhinestones and as wide as 15 or 20 rows.  The cool thing is you can take scissors and cut it to the width you want very easily.  
To apply it to the cake, I take my piping bag and pipe a zigzag of icing where I want to apply the banding and then press it into the icing.  When it's time to cut the cake, you'll have to remove the banding first!  Of course, it's not edible, and it wouldn't slice.  
3.  Metallic Paper Leaves:  So retro!  These have been around a long time!  Paper leaves in both silver and gold.  Super inexpensive!  They are just sturdy enough to tuck into the icing without bending. So quick and easy to use.  Of course, it's paper, so you pull them out before you eat the cake!
 4.  Dragees:  A dragee is a small, hard, ball of sugar that has a metallic coating.  They are quite hard, and it would be easy to break or chip a tooth if you bit into them just the right way.  In the past, they contained mercury, and they were classified as inedible.  They ARE edible, although the FDA recognizes them still as inedible and you cannot purchase them in California.  They are banned from sale there.  I find them at Byler's in Harrington and in Dover.  I do not use them to sprinkle on cupcakes.  I use them sparingly.  For example, in the cake below, I placed individual dragees on the cake in strategic locations:
Again, they ARE edible, but they are quite hard so be careful biting them!!
5.  Gold and Silver Sanding Sugar - Gold and Silver Pearls:
At a recent trip to Byler's in Harrington, I scored some metallic sanding sugar!  These are big granules of sugar.  Perfect so be sprinkled on a cupcake or on an icing rose!  At Redner's (grocery store) I found gold and silver pearls.  These are similar to dragees, but they are less metallic looking....more of a matte look than a metallic look...but much softer and easier on your teeth!
Here's a cupcake that has both gold and silver sanding sugar, gold and silver cake pearls, white cake pearls, and some black jimmies.

6.  Cake Toppers:  Of course, one of the easiest ways to add bling to a cake is with a beautiful, sparkly cake topper.  Inedible, but gorgeous!

I'm kind of addicted to all of this silver and gold.  I certainly hope this trend continues!

Monday, May 9, 2016

Ain't nobody got time for comparison shopping....

I complain about how much Walmart makes me crazy, but there really is a good reason to shop there....the Walmart mobile app.  On that app there is a feature called the "Savings Catcher."  When you shop at Walmart, your receipt has a QR code on the bottom.  If you scan that code with your smart phone within 5 days of your visit, you can potentially get money back.  Here's what the code looks like:
QR Code on a Walmart Receipt
After you scan your receipt in, the app takes over and does the work for you. It compares the prices in your area at the local grocery stores with the price you paid that day.  If they find a lower price, you get a refund for the difference!  

The other day I bought cake mix and pudding mix to make a wedding cake with.  If I was a thrifty person, I would shop the sales and find out that Food Lion had that cake mix on sale for $1 a box. Instead, I chose to pay the $1.17 that Walmart charged me and I scanned my receipt.  Just today I got the notification on my app...

The app found the sale price and refunded me the 17 cents for each box I bought.  I bought six.  I also bought pudding mix which was on sale as well:


For each box of pudding mix I bought, I got 14 cents back.  All in all, I got a refund of $1.10 on that one shopping trip.

You don't realize how fast the savings add up.  When you are ready to cash in your rewards, you have several options to choose from including getting a Walmart gift card or printing out an e-receipt that you take to the register to apply to your purchases.   

Instead of shopping for the best price on cake ingredients, I trust the Walmart app to return the savings to me instead.  One trip to one store.  I call that WINNING.  

Sunday, May 8, 2016

Some cupcake tips....

120 cupcakes.....6 cake mixes!
I have to admit, my favorite way to fulfill a cake order is through cupcakes.  It's just EASIER.  When you ice a layer cake you have to use a spatula to spread the icing, you have to wait for the icing to crust over a little (which means the humidity has to be good), and you have to smooth the icing after it crusts.  Then you have to worry did you get that layer of icing thick enough or do you have to do another layer of icing.  If you do cupcakes, the icing is the easiest part!  But before we get there.... the cupcake making...when you fill the cupcake liners with cake batter, use an ice cream scoop!
Use an ice cream scoop to fill a cupcake liner!

Fill the scoop about two-thirds full....

A nice big dollop of cake batter!
I like to bake in a convection oven because I can bake all 24 cupcakes at the same time.  One cake recipe makes two dozen.  I fill the ice cream scoop two-thirds full and plop the batter into the paper liner.  Invest in a NICE set of cupcake pans.  You want a nice heavy pan.  I'm using the Wilton brand pans, but I do have one from Baker's Secret that I like as well.

Once you bake your cupcakes and they are cool, it's time to finally get to the easy part....the icing!  It takes ONE icing tip in a piping bag to decorate your cupcakes.  It's the Wilton 1M.  It's a larger tip which means no coupler.  You simply cut the end off of the piping bag and pop the tip in and fill it up with icing.  Here's a picture of the 1M:
The Wilton 1M - the classic cupcake icing tip!

The Wilton 1M looks like a STAR.
To ice a cupcake with the 1M tip, start in the CENTER of the cupcake and swirl your way out to the edge while you pipe.  It makes the icing look like a rose.  Like this....
Start in the center and swirl to the outside.....
If you pipe from the outside to the middle, it makes the icing look like a star.  This isn't BAD, but when you put the sprinkles on and it's piped like that, many of the sprinkles fall off because the icing is starting to increase in height in the center.  If you pipe from inside to the outside, the icing is flat across the cupcake the sprinkles stay put!  See below for a sample of the "outside to inside" piping example:
Piped from the outside to the inside....what I consider the wrong way!
When it's all piped and you have applied your sparkles and sprinkles, here it is....
The finished cupcake!
Fast, easy,and beautiful.  Remember... pipe from the middle to the outer edge!  Perhaps I'll post a video soon!  Now go make some beautiful cupcakes!

Friday, May 6, 2016

A MUST have product.....a secret to cake perfection....


One of my BIG big MUST HAVES in the kitchen is a HUGE roll of plastic wrap.  You want to know a secret?  When my cake comes out of the oven, I do NOT leave it in the pan.  I IMMEDIATELY get it out of the pan and wrap it up in plastic wrap.  As you start wrapping it, the heat from the cake makes the plastic wrap shrink right up onto the cake.  While it cools, the moisture stays trapped inside.  Basically the cake is "sweating" inside the plastic and the sweat is going right back into the cake.  Makes it SOOOOOO MOIST.  So many of you have commented on how moist my cake is.  This is one of the reasons.  Of course, the ingredients help too, but this little method definitely takes it on over the edge to cake perfection!  I always bake my cake the day before I want to decorate it and allow it to hang out in the wrap overnight.  Now you know.... BJ's.... Sam's Club... Costco....  they can hook you up with a giant roll just like mine.

Monday, April 25, 2016

A little organization goes a long way....

There are so many tools and parts and pieces when it comes to cake decorating.  It can get overwhelming.  For someone like ME, it takes some extra thought when it comes to organization because I use these things often enough to need a really good storage system.  If everything is hard to get to, it makes me take more time when decorating and my profit goes down.  I get frustrated when I have to search for things also.  My mom came up with a GREAT idea for our cake decorating tips.  In one of the kitchen drawers, she placed two ice cube trays side by side.  Each cube receptacle holds one to four tips and we have them sorted by type.  In the back of the drawer in a larger white tray, we have the lesser used tips or the bigger sized ones.  This has proven to be a perfect way to store one of the most used items in cake decorating.  There are many other tools and items that are needed to decorate cake, but the tips are probably the most frequently used of all of them. Great job Mom for coming up with such a genius idea!

Monday, April 18, 2016

The Versatility of the Cupcake!

Cupcakes.  Such wonderful little things!  They can be a single work of beauty that stands alone...like this....
Black Forest Cupcake - a single sweet treat!
They can be baked in ice cream cake cones for a really awesome treat that makes for NO trash because there is no paper liner....

They can also be "accessorized" with pieces of cookie to create an entirely new look...like a high-heeled shoe!
Even better...you can stack them to create an object... like a race car!
You can arrange them in a shape like a circle to make a wreath....or in a triangle to form a Christmas tree....

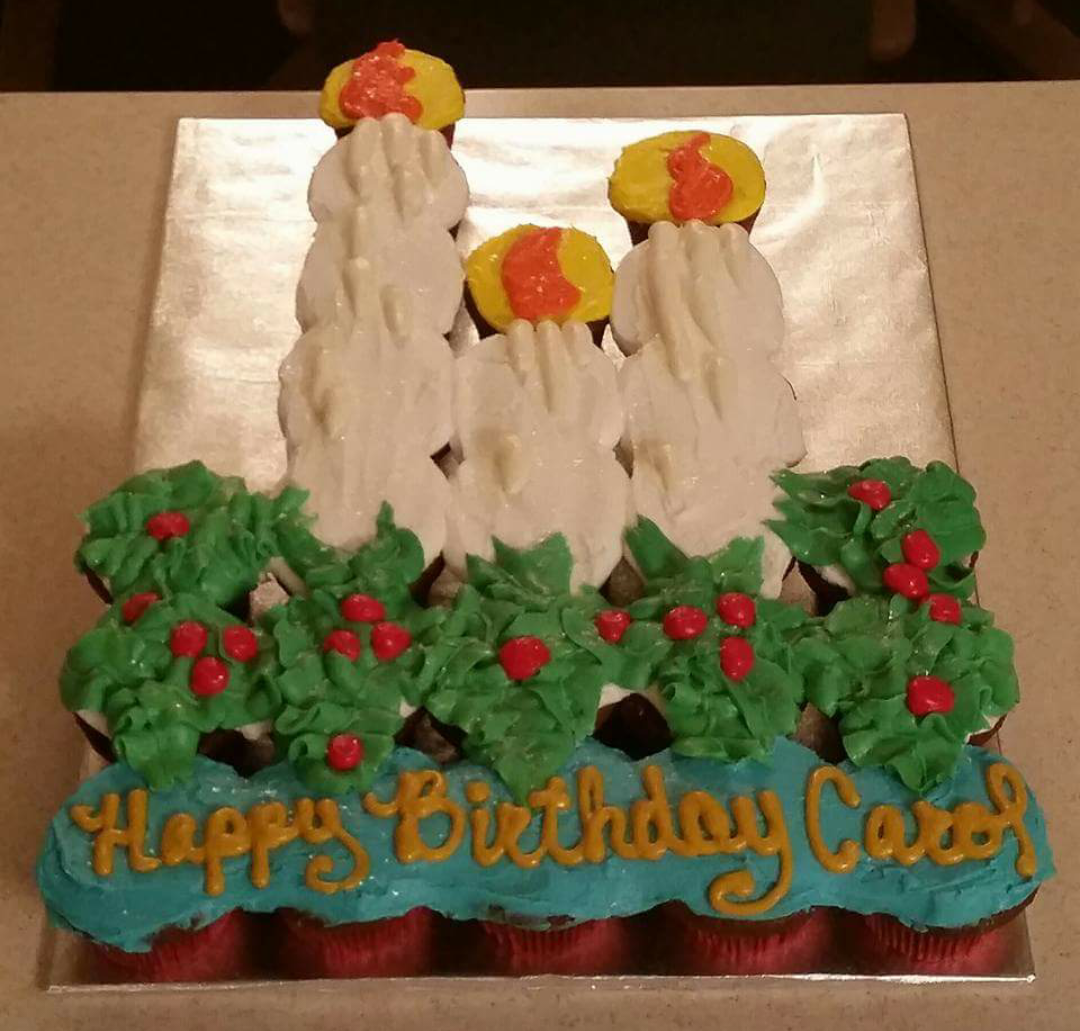
You can lay out two dozen in just the right way and turn them into a beautiful trio of Christmas candles....
If you google "pull apart" cupcakes or "pullaway" cupcakes or search them on Pinterest, you will find lots of neat ideas for how to put cupcakes together in various formations.  You can even ice them afterwards so they look like an iced cake.  You can't see where they begin and end.  The cool thing about pull apart cupcake cakes is that you don't need a knife to serve them.  You simply take the cake to the event and everybody can just grab their cupcake and pull it away from the rest.  Less fuss!  Great for elementary school parties!  Here are some samples of pull apart cupcake cakes I have done....
This was for my daughter's birthday....an aerial shot of the community swimming pool we frequented.  She had her birthday party at this pool.

These cupcakes formed a type of badge awarded to Brownies (Girl Scouts) called Try-Its.  This cake was made to thank the troop leader who was retiring.

This was a map of the world that my nephew Joshua neede to make for a school project.  He was allowed to have help creating the map but he had to label 41 parts on his own after it was done.  The next photo shows the labels he added.  He was popular at school that day!

Joshua labeled 41 parts of this map and presented this map to his class, after which he and his fellow students and teachers got to eat the project!

Another great thing about making a pull apart cupcake cake is that you can use various flavors in the same cake.  The photo below shows a cake where the customer needed cake for 7 people.  He wanted two servings of red velvet, two of chocolate, and two of vanilla, and one of lemon.  I put the single lemon cupcake in the center and surrounded it by two each of the other three flavors.  I iced it on top so it looked like one cake and put a border on it to pull it together.  I instructed him ahead of time that the lemon one was in the center.  They were able to tell the other flavors apart by looking at the paper liners on the sides because the flavors showed through the paper.
Of course, cupcakes are great in LARGE NUMBERS as well.  The photos below show a beautiful display of cupcakes for a wedding.  Pictured are 146 cupcakes.  The wedding guests had four cupcake varieties to choose from.... chocolate with chocolate icing, chocolate with vanilla icing, vanilla with vanilla icing, or vanilla with chocolate icing.  I made a very small layer cake for the bride and groom to cut, but the wedding attendees got to choose cupcakes!

As you can see, the possibilities are endless when it comes to cupcakes! 

And don't forget the sprinkles.... because sprinkles are for winners!