Tuesday, June 14, 2016

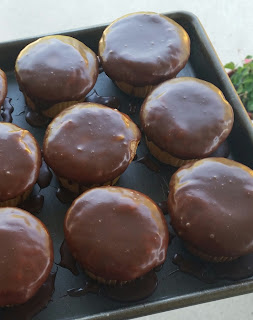
Boston Cream Pie Cupcakes

My brother just celebrated his birthday.  One of his favorite desserts is Boston Cream Pie.  I love making cupcakes rather than cake, so I made him a batch of these beautiful Boston Cream Pie Cupcakes this past weekend.  Very easy!  Here's how....

Start by making a vanilla cupcake.  You guys already have my recipe for cake!  If not, go back and hunt through the blog posts. I posted it before!  Let them cool, and you are ready for the next step...the filling!

Mix up a batch of vanilla pudding.  If I had to do it over again, I would have made the cook and serve pudding. I chose to use instant pudding.  I went with the French Vanilla flavor.  I think the cooked pudding makes a better tasting pudding, though.  Another thing I would have done differently is chilling the pudding before filling the cupcakes.  The pudding will go in a piping bag with a big round tip on it.  I used a #32 Star tip from Wilton.  They do make a filling tip but I didn't feel like digging mine out.  
Once I filled my piping bag with pudding, I simply jammed the piping tip down into the cupcake, piercing it in the center. Squeezing the bag will inject the pudding into the center of the cupcake.  When you pull away, you'll see a little pudding oozing out of the top of the cupcake.

Put the filled cupcakes in the fridge for an hour or so and let them get nice and solid.  Longer is even better.  

When it's time to ice them, mix up a batch of chocolate ganache. The post previous to this one gives you the recipe and instructions! Go take a peek!!!  

Once the ganache is ready, simply hold each cupcake upside down and dip right into the ganache, covering the tops.
Let the chocolate drip for a bit before you put them back on the cookie sheet they were sitting on.  I made the mistake of making MY ganache too thin for these.  Next time I will go a little heavier on the chocolate versus the heavy whipping cream.  They still tasted delicious!
Back to the fridge they go once they are dipped!  If they don't seem like they have enough chocolate coating the top, you can always dip them a second time once the first layer of chocolate has set up.

I prefer MY Boston cream pie to be cold when I eat it, so we kept the cupcakes in the fridge until it was serving time. A word of warning....these cupcakes are MESSY.  You will want to use a fork!

I wish you much success with these delicious treats!!!  And don't forget...when you make them....call my brother.  He will gladly volunteer to taste test them for you!


Don't fear the ganache!

One of the most decadent forms of chocolate icing is chocolate ganache.  It's takes only TWO ingredients to make it....and it's SOOOOO yummy!  It's kind of like making "chocolate soup."  

As pictured above, the two ingredients are chocolate chips and heavy whipping cream.  You need a big bowl and a sauce pan. Chocolate chips go in the bowl with a whisk ready to go.

Heat the heavy whipping cream until it almost comes to a boil. Then simply pour the heated cream into the bowl of chocolate chips and allow the chocolate to start melting.  Stir with a whisk until it becomes nice and melted and smooth....like chocolate soup!

The recipe is all about ratios.  To make normal chocolate ganache with dark chocolate, the ratio is 2 parts chocolate to 1 part cream. If you use 12 ounces of chocolate, use 6 ounces of cream.  If you want it to be thinner, add a little more cream.   For milk chocolate, the ratio would be 2.5 to 3 parts chocolate to 1 part cream.  For white chocolate, use 3 to 4 parts white chocolate to 1 part cream.

After you have stirred your ganache to a beautiful chocolate soup, it's ready to use.  If you want it to thicken up a little, you can let it cool for a bit.  It's perfect for dipping your cupcakes in or pouring over a cake.  

At the bakery, we would make it and pour it into a cake pan to cool. Once it was cool and SOLID, we could store it in the fridge for a week and cut chunks off (it resembled fudge) and melt it to use. You can melt it right back to a great consistency with the microwave.  I recommend using half power so you don't burn the chocolate or only microwaving in small increments.  

Just remember, the more stable you want the chocolate ganache to be, the more chocolate you'll want to use.  If you want it to be more runny, use more cream.  

I wish you much chocolate success!!

Saturday, May 21, 2016

Cake decorating steals your life.....

Madam Buttercream
While being a cake decorator is exciting and rewarding when you see the reaction of your customers, it has a very large down side:  it steals your life from you sometimes.  Let's take a look at one cake.....

A few weeks ago, I did a wedding cake.  I calculated that it took 11 hours to complete this cake.  I spent 45 minutes in Walmart shopping (plus driving to and from the store).  I also took a trip over to Byler's in Harrington for some special types of sprinkles and sanding sugar I needed.  That took 45 minutes.  It took me a half hour to drive to the venue that afternoon to deliver and finish everything.  I spent 4 hours baking cake and getting the kitchen cleaned up.  I decorated partially at the venue and partially at home.  Total decorating time took 2 hours at home (which included cleanup) and then 3 hours at the venue.

The worst part of all this is that it killed much of my weekend.  I spent a portion of Wednesday shopping....then Thursday as well shopping.  Friday evening, I spent 4 hours in the kitchen after working an 8-hour day.  I got up on Saturday morning and had to spend 2 hours getting the icing mixed and decorating the portions that would travel well.  After cleanup, I then had to get the car loaded and head to the venue, a half hour away, where I then spent 3 hours decorating.  Part of the reason it took 3 hours at the venue was the decorating team who were not ready for me.  It took time and I had to work around some things including helping to put the cake stand together and hot gluing the trim to the stand as they were busy working with other parts of decorating.

I left the wedding reception venue at 4 p.m.on a Saturday afternoon.  This killed over a half of my weekend.  I tend to undercharge for my cake, but then I stop and think about THIS....I gave up a LOT of my TIME.  It's not just the ingredients.  It's the TIME involved.  After that 11 hours was all said and done and it was 4:00 p.m., I was standing in a parking lot a half hour from home with a box full of supplies and lots of stuff to take home and clean up and put away.  So really that 11 hour total is not accurate if you add in the aftermath involved.

Cake has made me miss out on a lot of things in my life.  Cakes are for celebrations....and because everyone has busy weeks with work, the majority of these celebrations happen during the weekend which means MY weekend gets affected to make YOUR weekend special.  You can only work so far in advance.  I want your cake to be as fresh and newly decorated as possible.  People will ask me to do a cake a month in advance.  I will, of course, agree because that's what I do.  Then a week or so before the cake, an opportunity will come up where I can go somewhere or do something...but I can't because I agreed to do a cake.  Just this week that happened to me.

I agreed several months ago to do a cake for today.  It was all well and good until I realized that I hadn't thought about the baking time involved....and I had been signed up to attend an event with the ladies of my church at the beach.  I had to skip the night at the beach so I could bake a cake.  I also took on a house/dog sitting job.  This meant I had to also shuffle my time between my house baking the cake and then returning to where I was house/dog sitting.  I had plans last night to attend a play.  I purchased my ticket in advance.  I had no option but to get up early on a Saturday morning....not able to sleep in....to get started on the cake. It took 3 hours from start to finish to do a birthday cake that was only $35.  That's not a very great hourly rate.  It's much higher for a wedding cake, yet it's the same cake recipe....same icing....just different celebration attached to the cake.  Nobody in their right mind would pay the wedding price for a birthday cake, though.

As much as I enjoy doing my cake decorating, since I'm not actually in a bakery, all I'm really doing is killing my own time when I take on cake orders, especially if it's not for a wedding cake because there's no profit in birthday cake.  While I'm making back the money on the ingredients, I certainly am losing money on the time.

Last weekend, my kids were here visiting.  They live with their dad.  They came in on a Friday night to find me in the kitchen baking.  I had to get up the next morning and deliver a cake an hour away. Fortunately my daughter went with me to deliver the cake.  When we got back, I decorated a cake for HER birthday and because I wanted her to not see it until it was finished, I banished her from the kitchen which made several hours of time without her.  Then I had to turn around and bake and decorate cake that evening for an event on Sunday.  I spent an entire weekend in the kitchen.  The kids were here and I spent time without them...or they were forced to be in the kitchen if they wanted to see me....and had to share their time with cake.

I'm thinking about the upcoming summer months and how I'd love to be able to spend time doing things I enjoy....and not spending it in the kitchen.  Perhaps a sabbatical....

Half and half.... the easy way

Half Chocolate + Half Vanilla = Easy
Most cake pans from Wilton only need one cake mix to fill them so you are forced to choose a single flavor.  A quarter sheet cake is the 9 x 13 size pan.  That's one cake mix.  If you want two flavors in your cake, you'll need to move up to the half sheet, size 11 x 15. Since it takes two cake mixes to fill the 11 x 15 pan, this is the perfect time to add a second flavor to your cake.  When you fill the pan, simply pour one flavor into one side and the other flavor into the other and let them come together in the middle.  You COULD take a knife and swirl around and make more of a marble cake, but it's super easy just to let the flavors meet in the middle.  If you really want to be NEAT about it, create a "dam" in the middle of the pan with a piece of folded aluminum foil.  Once the cake mix is filled into both sides of the pan and meets at the "dam," you can pull out the "dam" and you have a nice neat line separating the two flavors. I've stopped using that method myself and usually just pour one flavor in first, then the second as quickly as possible and hope for the best!

While sometimes it takes longer for chocolate to bake than the vanilla, I've actually found that the cake finishes at the same time when it's baked together like this!  Of course, you could do this method with a smaller pan, but you'll have two halves of a cake mix left over to deal with....but then....that's the perfect excuse for cupcakes!  Don't you think?

Thursday, May 12, 2016

Add a little pudding....

When I bake a cake, I do use a box mix, BUT I do not follow the recipe on the box.  I recently shared my cake recipe on Facebook.  I start with the mix but I add a small box of INSTANT pudding mix, a stick of melted butter, a cup of whole milk, a half a can of sweetened condensed milk, and four eggs.  If I'm making chocolate cake, I add an extra 1/4 cup of milk because it needs more liquid.  I found the strawberry cake needed extra liquid last week too.

When you choose your pudding flavor, you can ALWAYS use vanilla.  Vanilla will work well with ANY flavor.  I like to match the pudding to the cake flavor, though.  As pictured above, for last week's wedding cake, I used French vanilla for the vanilla cake, chocolate for the chocolate cake, and strawberry cream pudding for the strawberry cake.  I didn't even KNOW until last week that they made strawberry cream pudding.

The pudding is just one more thing that makes the cake so moist!  

Wednesday, May 11, 2016

It's all about the bling!

My wedding cakes have been following a trend lately.... bling has taken over!  It seems that sparkle is in!  There are many ways to add sparkle and bling to any cake.  Here are a few ideas...
Wilton Cake Sparkles
1.  Cake Sparkles:  One thing I always add to birthday cakes is sparkle... Wilton Cake Sparkles.  They come in many colors, but the irredescent ones are my favorite.  They add a beautiful sparkly touch to a cake! Completely edible, they are just flakes of sugar. They run close to $5 at Michaels but you can always use your 40% off coupon on them because they are never on sale.  Walmart carries them as well.  Just don't wait until the last minute to purchase them as the irridescent ones tend to sell out every now and then.  They aren't always readily available.
Rhinestone Banding
2.  Rhinestone Banding:  You can purchase this in craft stores.  It's actually just plastic that simulates the look of rhinestones.  It comes in bands of different widths.  I've seen it as skinny as one row of rhinestones and as wide as 15 or 20 rows.  The cool thing is you can take scissors and cut it to the width you want very easily.  
To apply it to the cake, I take my piping bag and pipe a zigzag of icing where I want to apply the banding and then press it into the icing.  When it's time to cut the cake, you'll have to remove the banding first!  Of course, it's not edible, and it wouldn't slice.  
3.  Metallic Paper Leaves:  So retro!  These have been around a long time!  Paper leaves in both silver and gold.  Super inexpensive!  They are just sturdy enough to tuck into the icing without bending. So quick and easy to use.  Of course, it's paper, so you pull them out before you eat the cake!
 4.  Dragees:  A dragee is a small, hard, ball of sugar that has a metallic coating.  They are quite hard, and it would be easy to break or chip a tooth if you bit into them just the right way.  In the past, they contained mercury, and they were classified as inedible.  They ARE edible, although the FDA recognizes them still as inedible and you cannot purchase them in California.  They are banned from sale there.  I find them at Byler's in Harrington and in Dover.  I do not use them to sprinkle on cupcakes.  I use them sparingly.  For example, in the cake below, I placed individual dragees on the cake in strategic locations:
Again, they ARE edible, but they are quite hard so be careful biting them!!
5.  Gold and Silver Sanding Sugar - Gold and Silver Pearls:
At a recent trip to Byler's in Harrington, I scored some metallic sanding sugar!  These are big granules of sugar.  Perfect so be sprinkled on a cupcake or on an icing rose!  At Redner's (grocery store) I found gold and silver pearls.  These are similar to dragees, but they are less metallic looking....more of a matte look than a metallic look...but much softer and easier on your teeth!
Here's a cupcake that has both gold and silver sanding sugar, gold and silver cake pearls, white cake pearls, and some black jimmies.

6.  Cake Toppers:  Of course, one of the easiest ways to add bling to a cake is with a beautiful, sparkly cake topper.  Inedible, but gorgeous!

I'm kind of addicted to all of this silver and gold.  I certainly hope this trend continues!

Monday, May 9, 2016

Ain't nobody got time for comparison shopping....

I complain about how much Walmart makes me crazy, but there really is a good reason to shop there....the Walmart mobile app.  On that app there is a feature called the "Savings Catcher."  When you shop at Walmart, your receipt has a QR code on the bottom.  If you scan that code with your smart phone within 5 days of your visit, you can potentially get money back.  Here's what the code looks like:
QR Code on a Walmart Receipt
After you scan your receipt in, the app takes over and does the work for you. It compares the prices in your area at the local grocery stores with the price you paid that day.  If they find a lower price, you get a refund for the difference!  

The other day I bought cake mix and pudding mix to make a wedding cake with.  If I was a thrifty person, I would shop the sales and find out that Food Lion had that cake mix on sale for $1 a box. Instead, I chose to pay the $1.17 that Walmart charged me and I scanned my receipt.  Just today I got the notification on my app...

The app found the sale price and refunded me the 17 cents for each box I bought.  I bought six.  I also bought pudding mix which was on sale as well:


For each box of pudding mix I bought, I got 14 cents back.  All in all, I got a refund of $1.10 on that one shopping trip.

You don't realize how fast the savings add up.  When you are ready to cash in your rewards, you have several options to choose from including getting a Walmart gift card or printing out an e-receipt that you take to the register to apply to your purchases.   

Instead of shopping for the best price on cake ingredients, I trust the Walmart app to return the savings to me instead.  One trip to one store.  I call that WINNING.  

Sunday, May 8, 2016

Some cupcake tips....

120 cupcakes.....6 cake mixes!
I have to admit, my favorite way to fulfill a cake order is through cupcakes.  It's just EASIER.  When you ice a layer cake you have to use a spatula to spread the icing, you have to wait for the icing to crust over a little (which means the humidity has to be good), and you have to smooth the icing after it crusts.  Then you have to worry did you get that layer of icing thick enough or do you have to do another layer of icing.  If you do cupcakes, the icing is the easiest part!  But before we get there.... the cupcake making...when you fill the cupcake liners with cake batter, use an ice cream scoop!
Use an ice cream scoop to fill a cupcake liner!

Fill the scoop about two-thirds full....

A nice big dollop of cake batter!
I like to bake in a convection oven because I can bake all 24 cupcakes at the same time.  One cake recipe makes two dozen.  I fill the ice cream scoop two-thirds full and plop the batter into the paper liner.  Invest in a NICE set of cupcake pans.  You want a nice heavy pan.  I'm using the Wilton brand pans, but I do have one from Baker's Secret that I like as well.

Once you bake your cupcakes and they are cool, it's time to finally get to the easy part....the icing!  It takes ONE icing tip in a piping bag to decorate your cupcakes.  It's the Wilton 1M.  It's a larger tip which means no coupler.  You simply cut the end off of the piping bag and pop the tip in and fill it up with icing.  Here's a picture of the 1M:
The Wilton 1M - the classic cupcake icing tip!

The Wilton 1M looks like a STAR.
To ice a cupcake with the 1M tip, start in the CENTER of the cupcake and swirl your way out to the edge while you pipe.  It makes the icing look like a rose.  Like this....
Start in the center and swirl to the outside.....
If you pipe from the outside to the middle, it makes the icing look like a star.  This isn't BAD, but when you put the sprinkles on and it's piped like that, many of the sprinkles fall off because the icing is starting to increase in height in the center.  If you pipe from inside to the outside, the icing is flat across the cupcake the sprinkles stay put!  See below for a sample of the "outside to inside" piping example:
Piped from the outside to the inside....what I consider the wrong way!
When it's all piped and you have applied your sparkles and sprinkles, here it is....
The finished cupcake!
Fast, easy,and beautiful.  Remember... pipe from the middle to the outer edge!  Perhaps I'll post a video soon!  Now go make some beautiful cupcakes!

Friday, May 6, 2016

A MUST have product.....a secret to cake perfection....


One of my BIG big MUST HAVES in the kitchen is a HUGE roll of plastic wrap.  You want to know a secret?  When my cake comes out of the oven, I do NOT leave it in the pan.  I IMMEDIATELY get it out of the pan and wrap it up in plastic wrap.  As you start wrapping it, the heat from the cake makes the plastic wrap shrink right up onto the cake.  While it cools, the moisture stays trapped inside.  Basically the cake is "sweating" inside the plastic and the sweat is going right back into the cake.  Makes it SOOOOOO MOIST.  So many of you have commented on how moist my cake is.  This is one of the reasons.  Of course, the ingredients help too, but this little method definitely takes it on over the edge to cake perfection!  I always bake my cake the day before I want to decorate it and allow it to hang out in the wrap overnight.  Now you know.... BJ's.... Sam's Club... Costco....  they can hook you up with a giant roll just like mine.

Monday, April 25, 2016

A little organization goes a long way....

There are so many tools and parts and pieces when it comes to cake decorating.  It can get overwhelming.  For someone like ME, it takes some extra thought when it comes to organization because I use these things often enough to need a really good storage system.  If everything is hard to get to, it makes me take more time when decorating and my profit goes down.  I get frustrated when I have to search for things also.  My mom came up with a GREAT idea for our cake decorating tips.  In one of the kitchen drawers, she placed two ice cube trays side by side.  Each cube receptacle holds one to four tips and we have them sorted by type.  In the back of the drawer in a larger white tray, we have the lesser used tips or the bigger sized ones.  This has proven to be a perfect way to store one of the most used items in cake decorating.  There are many other tools and items that are needed to decorate cake, but the tips are probably the most frequently used of all of them. Great job Mom for coming up with such a genius idea!

Monday, April 18, 2016

The Versatility of the Cupcake!

Cupcakes.  Such wonderful little things!  They can be a single work of beauty that stands alone...like this....
Black Forest Cupcake - a single sweet treat!
They can be baked in ice cream cake cones for a really awesome treat that makes for NO trash because there is no paper liner....

They can also be "accessorized" with pieces of cookie to create an entirely new look...like a high-heeled shoe!
Even better...you can stack them to create an object... like a race car!
You can arrange them in a shape like a circle to make a wreath....or in a triangle to form a Christmas tree....

You can lay out two dozen in just the right way and turn them into a beautiful trio of Christmas candles....
If you google "pull apart" cupcakes or "pullaway" cupcakes or search them on Pinterest, you will find lots of neat ideas for how to put cupcakes together in various formations.  You can even ice them afterwards so they look like an iced cake.  You can't see where they begin and end.  The cool thing about pull apart cupcake cakes is that you don't need a knife to serve them.  You simply take the cake to the event and everybody can just grab their cupcake and pull it away from the rest.  Less fuss!  Great for elementary school parties!  Here are some samples of pull apart cupcake cakes I have done....
This was for my daughter's birthday....an aerial shot of the community swimming pool we frequented.  She had her birthday party at this pool.

These cupcakes formed a type of badge awarded to Brownies (Girl Scouts) called Try-Its.  This cake was made to thank the troop leader who was retiring.

This was a map of the world that my nephew Joshua neede to make for a school project.  He was allowed to have help creating the map but he had to label 41 parts on his own after it was done.  The next photo shows the labels he added.  He was popular at school that day!

Joshua labeled 41 parts of this map and presented this map to his class, after which he and his fellow students and teachers got to eat the project!

Another great thing about making a pull apart cupcake cake is that you can use various flavors in the same cake.  The photo below shows a cake where the customer needed cake for 7 people.  He wanted two servings of red velvet, two of chocolate, and two of vanilla, and one of lemon.  I put the single lemon cupcake in the center and surrounded it by two each of the other three flavors.  I iced it on top so it looked like one cake and put a border on it to pull it together.  I instructed him ahead of time that the lemon one was in the center.  They were able to tell the other flavors apart by looking at the paper liners on the sides because the flavors showed through the paper.
Of course, cupcakes are great in LARGE NUMBERS as well.  The photos below show a beautiful display of cupcakes for a wedding.  Pictured are 146 cupcakes.  The wedding guests had four cupcake varieties to choose from.... chocolate with chocolate icing, chocolate with vanilla icing, vanilla with vanilla icing, or vanilla with chocolate icing.  I made a very small layer cake for the bride and groom to cut, but the wedding attendees got to choose cupcakes!

As you can see, the possibilities are endless when it comes to cupcakes! 

And don't forget the sprinkles.... because sprinkles are for winners!